Friday, 30 September 2011

Countdown to Christmas (Week 13)- Poinsettia Wall Hanging

Poinsettia Wall Hanging

This week for my Christmas countdown was made on a cold spring day (during a blizzard) while I lived in Repulse Bay, Nunavut (Aug. 2006- June 2007).  Once again, I borrowed a pattern and some fabric from Betty Brown, the lady that we shared a house with for that year.   I love the decoration and I put it up every year, but when I do it brings back memories of a wonderful uncle who passed away during the time that  I was working on this project.

Although it was such a sad time, especially being so far away from family, each year when I hang it for Christmas, I remember his life and the wonderful man he was.

Here is the project:

I do not have any photos of the process or the pattern, but it should not be very difficult to replicate using a photo from the internet.   I begin with some red velvet material that I cut out in the shape of a Poinsettia, some green leaves, a gold centre and some white fabric.  I appliqued these pieces to a piece of white fabric.

Then I added the borders.  When I had the top piece done I taped it to the floor using masking tape.  I placed a piece of fabric for the back to it so that the two right sides were facing each other.  Then I placed some batting on the top.  I sews around the edges, leaving a space of about 6 inches.  It was like a bag that I had to turn right side out.


Then I did some top stitching to give it more detail.


To finish it off, I added some tabs to the top.  

Tuesday, 27 September 2011

Fall Vase

I enjoyed making the twiggy candle holder and I had some supplies left over, so I began to look for possibilities.  I gathered the following supplies:

Twigs
A fall Pick
Fall Scrap Book Paper
Double sided tape
Stickers with leaves
A glass jar


The first thing I did was take apart the fall pick, so that I have 5 or 6 small pieces.  I attached all of these, except two, to the twigs.  This was easy since the picks were made from wire and could be bended around the branches.

Using the double sided tape, I attached one of the pieces of paper to the jar, followed by two strips of brown.

Next I used the remaining two pieces of the orange pick and took them apart.  I made a circle to go around the bottom of the jar.  The final step was to put some leaves around the top of the jar.


Of course, the twigs had to be placed inside.   Then I experimented with the placement of my new decoration.


Sunday, 25 September 2011

Twigs for Fall Candle

I have this candle holder that I bought at Michael's in a clearance sale, but it always looked blah to me.   I was looking through a candle catalogue and got a great idea to "twig" this one up.  I cut some twigs from a tree got a fall pick from the dollar shop and plugged in the glue gun.

I started by taking all of the berry twigs from the pick and making the wire stem into a circle.  I then glued twigs to the circle with the glue gun.  I also put some fall twigs in between.  Then I inserted it into the candle holder with the candle.  I then attached some fall berry twigs to the candle holder.  Still one more step-- Add a little ribbon that I had left over from my Ribbon Pumpkin (also posted to my blog).

The following is the final result.   However,  if you decide to use this idea, it is strongly recommended that you use a non-flame candle :-).


Wednesday, 21 September 2011

Count Down to Christmas (Week 14)

I know it's only September, but time has a way of sneaking around and before we know it, it's time to get ready for the jolly man in red.  Therefore, I am going to do a countdown to Christmas where I will add at least one Christmas idea a week until it arrives.  So here is Week 14.

Last Year, I wanted to decorate my plain white lamp shades for Christmas.  I liked them so much that I never did take the decorations off after.  It did not entirely say "Christmas" and it still complimented my living room.

My first task took me to Canadian Tire where I bought 2 candle ring accents.  This did not fit around my lamp, so I took it apart and made it into something that would.  Then I used the branches to keep it in place.  

The result was pleasing.

I still wanted to do something else though.   I took a piece of fabric that I had used to make cloths for the coffee and end tables and I ripped at strip to tie around the lamp.  This is the result.


Tuesday, 20 September 2011

Heritage Quilt

While attending a heritage fair with my nephew, Matthew, I started thinking about ways to preserve our culture.  Newfoundlanders are known to have a strong sense of identity with the way of life that we have. However as with all cultures, it evolves and changes with each new generation and the technology that comes with it.

My father's family resettled from Silver Fox Island in the early 1960's, so this next blog will be my efforts to capture my heritage and the way of life on a small island in Bonavista Bay, NL in the form of a heritage quilt.

It will take some time to finish the project, but I plan to blog my progress.  This quilt will consist of a series of images sketched on Muslin fabric.  The sketches are then shaded with Crayola Crayons.  When completed I cover the picture with brown paper and iron it it melt the crayon and to ensure that it does not come off.  Anyway, here I go.

The first picture identifies the location and basic shape of the island.  The island is about 3 km in length.  In1901 there were 82 people living there, but as a result of Resettlement by 1969, the island was completely abandoned.  The town of Hare Bay, identified on the map, is where my family resettled.


The second picture is a Cod Fish jigger.  These were quite common in the early fishery in Newfoundland.  I can recall using these to catch fish.  Today we use hook and line with bait.
The next picture is a sketch of an old stage.  The stage was the area where the fishing gear was stored and where the catch was cleaned.  This represents the one used today by my father during the summer when he fishes from the island.  My artistic skills are not good enough for an exact replica, but it does capture what it was like.
 This picture depicts a lobster fisherman as he heads out to set his traps just as the sun begins to rise.  My father still catches lobsters during the summer.  I can recall seeing the traps piled by the shed during the spring and Dad making the heads to go in the traps.  The head were made from twine and attached to the opening.  I also remember his boat and the wharf loaded with traps during the spring of the year.  I couldn't wait for the first meal of lobsters, still can't
 When the daily catch of Cod fish were brought back to the island, they were unloaded from the boat and cleaned.  The splitting table was used to put the fish on to remove the innards (or as we say to gut the fish).  Traditionally, the fish were also split (backbone removed), salted, and dried to preserve them for the winter.
 This picture is one of my father in his boat looking down at his catch of lobster.

That's all I have done at this time.  Stay tuned for more....

Sunday, 18 September 2011

Ribbon Pumpkin


This project took me to the corners of the shed where there were pieces of 2x4 lumber left from the construction of our flower garden.  I selected four of these pieces for my ribbon pumpkin.   You need 1 piece longer ("6), 2 about the same size (4"), and 1 small piece (1"). I painted 3 of them terra-cotta orange and 1 green. 
Then I took one of the 4" pieces and drilled 6 holes in it.
I then took black craft wire into each hole, bent it on the bottom and put it to one side for now. Using screws I attached the 6" piece and the other 4" piece.


Next I took the 4" piece with the wire.  I put hot glue on the bottom of each piece of wire.  
Before it hardened, this piece was placed on top of the other two pieces.  Again, I used screws to attach it and the green piece.  All wood is now screwed in place.
Using hot glue and wire ribbon, I attached pieces of ribbon to the top of the wood.  I curled the wire as well to make it look like vines.   This was the result.


Saturday, 17 September 2011

Curtains and Pillows

 some of you may know,  I have problems spending a lot of money on items that I can make myself.  Thus, when it was time for new curtains in my bedroom, where I have 2 windows, it was shopping for fabric.  Fabricville had material that I really liked for $3.00 a meter, so I bought it.   Anyway here are the curtains I made using a Simplicity Pattern and since I love stars, I hung a star from each curtain to give it a country look.  


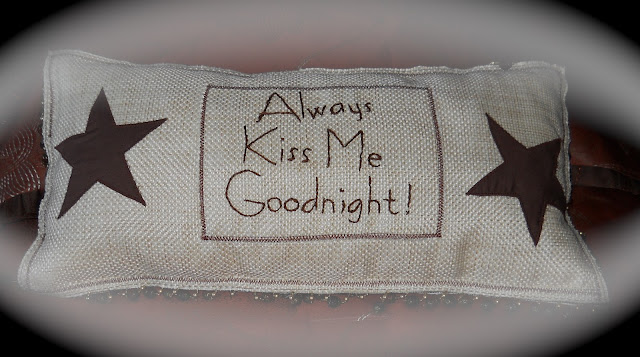
I had material left over and wasting good material is not an option, so I made an accent pillow for the bed.  I wanted to stitch something onto it and since it was for the bedroom, I used "Always Kiss Me Goodnight.  For this I printed the words from the computer and actually pinned the paper to the fabric.  I stitched the fabric and the paper and just tore the paper off when I was done.  Worked like a charm.
Then I machine appliquéd the fabric onto the rectangle that was to be the front of the pillow.  Added a couple of fabric stars and voila!
  
Still more fabric left over.  So I made 4 pillows for the living room.   Appliqued a large star in the centre  and sewed some little metal stars as well.  The metal stars have not med the favorites list of some because they have been known to stick into body parts when they are sat on.  (That's okay, I don't want these pillows to be used for head rests anyway.  Another way to preserve the look.  Only one draw back is Lexi, my dog who sheds, doesn't seem to mind the metal stars).


Still more left for dresser cloths.  Here are two of them.  


It cost me $15.00 for curtains, cloths for dressers, a pillow for my bed, and 4 pillows for the living room.  So now when I get tired of this, I can justify making more.   Oh, and I have a few more scraps left that may become a part of some Christmas decoration sometime.  Fun stuff!!

My Fabric Wreath

The was a wreath that I made while living in Repulse Bay, Nunavut.  The long cold winter gave me a lot of time to be crafty during my year there.  I am sure I will share more as time goes on.  That year, Wayne and I shared a house with another teacher in the community, Betty Brown, who also enjoyed making things.  She was prepared and took a lot of supplies with her and at times I borrowed from her stash.


Bows
For this project I began by making about 50 bows out of fabric. (It may have been more.   I just made more until I covered the frame). The bows were made by cutting strips of material-- about 2x4 inches.  Since the material was not stiff, I did a front and back to the bow by putting the right sides together and sewing around both pieces.  I left about an inch opening that I used to turn the bow right side out.  (I left the opening in the centre of one side so that I didn't have to be too particular in stitching the opening.  I was going to tie it anyway.)

Next I put a dab of hot glue on the opening that I had left and tied a piece of hemp string on each of the bows.   To make a wreath I had to have a circle of some sort, which was a challenge to find.  I started with a wooden quilting frame and put batting and material around it to make it larger.  Turned out to be quite useful.

Then I took each of the bows and hot glued them to the frame.  It turned out good.  Of course if you were picking up fabric for this or using left overs from a quilt, it may be easier to have a particular color scheme.   I have kept it hanging on the laundry room door for the past couple of years.

I decided though to give it another application for fall.

I hung it on my outside door.  (It will not be damaged because there is a storm door there as well).


Friday, 16 September 2011

Bouquet of Flowers

I just discovered the fabric Yo-Yo.  This easy craft has many different applications and I don't think this will be the last time that I do these. I have a wooden vase filled with flowers that I wanted to replace, so instead of buying them, I decided to make something using the Yo-Yo. Have a look at what I did.
I started by drawing circles on fabric using a bowl for the large ones and a juice glass for the smaller one.


Using a needle and thread, I stitched around the perimeter of the circle. I did not hem the edge because I was planning to glue something to the front. If you do not intend to do this, hem the edge while stitching.

Pull the thread to make the round shape below and make a couple of stitches to secure the end.  You will need to pull the sides to create the flat, round shape.


I then used a glue gun to stick a star to the front of the Yo-Yo. The star was one from a Christmas Garland that I purchased last year at Wicker Emporium. I used a wooden skewer as my stem and glued it to the back of the Yo-Yo (flower).


Do this for as many flowers as you want. Then stick them in the green foam for flower arrangements. (I didn't have any so I used an old spice bottle and stuck the skewers in the holes). Then add some greenery. I snipped some from another flower arrangement--- can't even notice it.


Thursday, 15 September 2011

The Pumpkin Patch

For most of my life September was the beginning of a new school year- as a student and then as a teacher.  Thus the hustle and bustle of a new year was the priority, meaning that fall crafts were nonexistent for me.  By the time things settled down, fall and halloween were forgotten and the focus became Christmas.   Since I am no longer teaching, the thought occurred to me this year to change that-- so I have made my first attempt at creating fall at the Sturge home.    Inspired by a colleague, Sarah Gill, who has mentioned making more fabric pumpkins and a magazine Crafts N Things, I spent Saturday in my Pumpkin Patch.   After the fact, I realized that I should have taken pictures of the process, but I will attempt to provide instructions for them and borrow from another crafter.  


Fabric Pumpkin Pattern
Step 1

Cut out a fabric rectangle on the bias that's twice as long as it is wide. (We used 5-by-10-inch, 8-by-16-inch, and 11-by-22-inch pieces for our three pumpkin sizes.)
Step 2

Fold rectangle, right side up, so short sides meet; stitch along that edge with 1/4-inch seam allowance. With doubled thread and running stitches, sew along 1 end; pull thread to cinch fabric closed, and stitch to secure.

Step 3

Turn pouch right side out; stuff with batting. With doubled thread and running stitches, sew around open end; pull thread to cinch fabric, and stitch to secure.
Step 4

Thread long needle with floss. Wrap floss around pumpkin, pulling through the core several times, to add ridges.
Step 5

For stem, cut out 2 stem-size pieces of fabric. Stitch pieces, right sides facing, leaving base open. Turn right side out; stuff with batting. Secure open end to pumpkin with slip stitches.

Read more at Marthastewart.com: Fabric Pumpkins - Martha Stewart Crafts

However, as with many of the project ideas I borrow,  I added a different stem, a leaf, and some vines.  This is what I ended up with below.  


Monday, 12 September 2011

Why The Root Cellar?

When I began thinking about doing a blog, I contemplated about a title-- of course it has to have a name.   I guess I tried to be creative and original, but then considered the purpose of the blog.   Yes, it is to share, but it is a little deeper than that.  I think about all that I have created in the past-- the quilts I've made, the things I have made to give away, and the things that have lost their luster and ended up eventually in the garbage. Whatever the fate, they are gone without anything other than the memory of me making it and the joy of giving it away.   As well,  for me creating has been somewhat of a social activity where friends and family have joined to spend some time just sewing, making crafts, or sharing ideas.  It is a part of who I am as much of what I know, I have been taught by my family or by people whose paths have crossed mine.   So, I guess one purpose of the blog is to preserve my creations, exactly the same way a "root cellar"  preserves.